
A good defect photo can save hours of guessing, a bad defect photo can do the opposite.
When a casting problem appears, it is natural to take a quick picture and send it to the supervisor, engineer, customer, supplier, or outside technical contact with a simple question: “What caused this?”
But a photo by itself rarely answers that question. In many cases, the photo only begins the conversation. The value of the image depends on whether it shows enough information to help someone understand what they are actually looking at.
A close-up photo of a hole, crack, rough surface, or dark indication may look obvious to the person standing next to the casting. To someone else, it may be impossible to judge size, location, depth, orientation, surface condition, or whether the feature is even on the original casting surface. Without context, a defect photo can make gas porosity look like shrinkage, shrinkage look like machining damage, sand look like dross, or a handling mark look like a casting discontinuity.
The goal is not to take prettier pictures. The goal is to take more useful pictures.
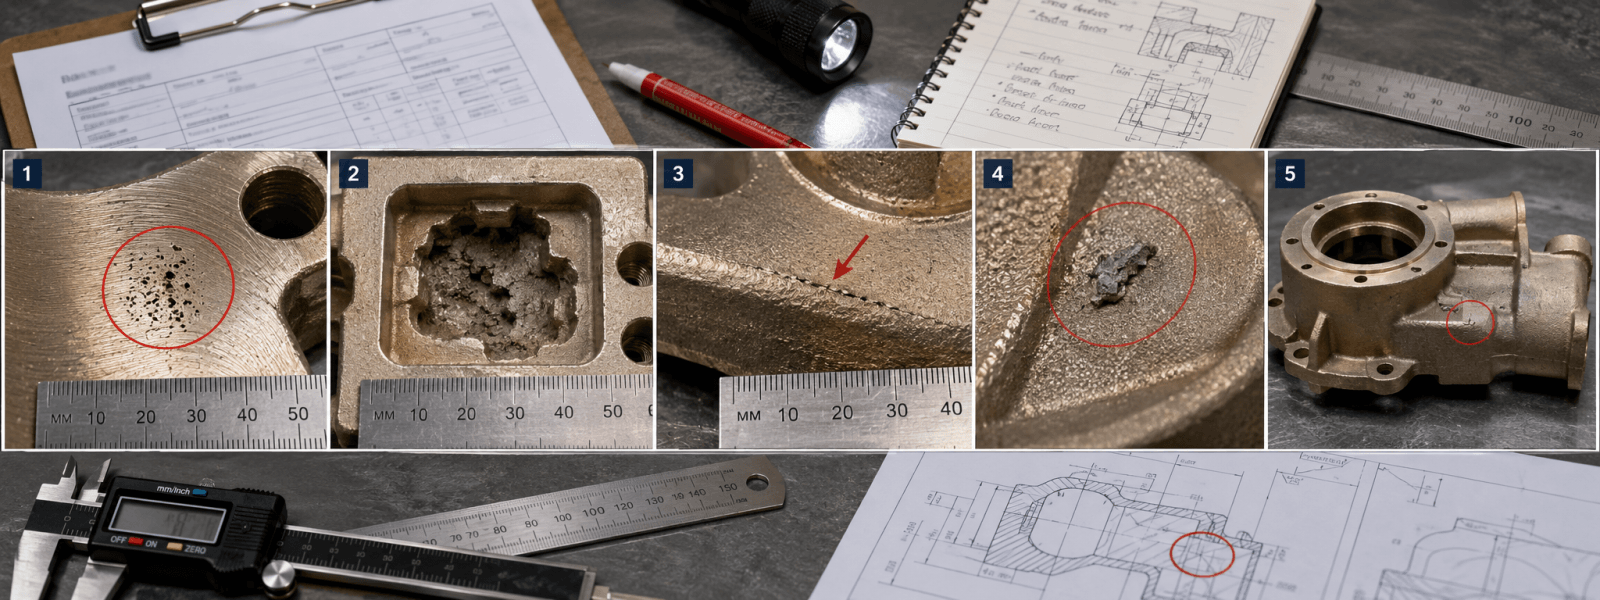
A useful defect photo usually starts with context. Before taking the close-up, take a wider image of the whole casting or the affected area of the casting. Show where the defect is located relative to the gate, riser, boss, flange, machined surface, cored passage, pressure wall, parting line, or other recognizable feature. If possible, include a marked-up drawing or sketch showing the same location.
Then take the close-up.
The close-up should be clear, well-lit, and in focus. It should include a scale reference whenever possible: a ruler, caliper, coin, inspection scale, or even a marked dimension on the drawing. Without scale, a small pore can look like a large cavity, and a shallow surface mark can look more serious than it is.
Lighting also matters. A flashlight held at a low angle can reveal surface texture, cracks, laps, cold shuts, sand adhesion, machining tears, and roughness that overhead lighting may hide. For shiny machined surfaces, glare can conceal the very feature being photographed. Take more than one angle when needed.
The best photos also preserve the sequence of discovery. If the defect was found as-cast, photograph it before grinding, blasting, welding, or excavation. If it appeared during machining, photograph the machined surface, the tool path if relevant, and the depth or operation where it appeared. If the defect was opened for investigation, photograph the excavation in stages. If penetrant, radiography, pressure testing, or other inspection revealed the issue, keep images or records from those inspections tied to the same casting location.
It is also helpful to photograph what is nearby. A porosity indication near a heavy section may raise different questions than the same indication near an ingate or core print. A surface defect on the cope may suggest different causes than one on the drag. A repeated defect in the same location across several castings is more important than a single isolated mark.
The photo should travel with a few basic facts: alloy, casting process, part area, production stage, inspection method, number of castings affected, whether the issue is new or recurring, and any recent changes in material, tooling, sand, cores, gating, risering, pouring temperature, supplier, heat treatment, machining, or customer requirements.
That may sound like extra work, but it often reduces work. Better photos help the team ask better questions sooner. They help separate appearance from cause. They help prevent unnecessary process changes. They also improve communication with customers, suppliers, labs, and technical support resources.
A defect photo should not be treated as proof of root cause. It should be treated as evidence.
The strongest defect investigations do not begin with the question, “What do we think caused this?”. They begin with a clearer question: “What are we actually seeing?”